
The document tree is an extra widget you can use to give more structure to your documents. By default you start with configuring the document collection. Most of the time the next step is that you take a look at your collection and put the list widget somewhere on a dashboard of your choice. You'll get to see your documents for example just as you see here below. As you can see, this is a simple list with further no specific structure. Go ahead and learn about creating folders and adding more structure to your document management.

Now, by using the document tree, we'll be able to structurize our documents in folders. What are the benefits of using a document tree/folder structure?
As said, the document tree is a widget, so go to the settings of BizzMine and choose for "document tree" in the widgets section. Next, click on "create document tree".
Here, you'll decide which document collections can be used in this document tree. This means that every collection that is selected and allowed here, will be available to create folders for. In some cases you only want one big document collection wherein you will manage all your documents, but in some cases you might want to differentiate your documents not only by folder but also in terms of collections. Why? Because the form that you use in document collection A, might be totally different than the form you use in document collection B, or the flow that is behind each collection is completely different.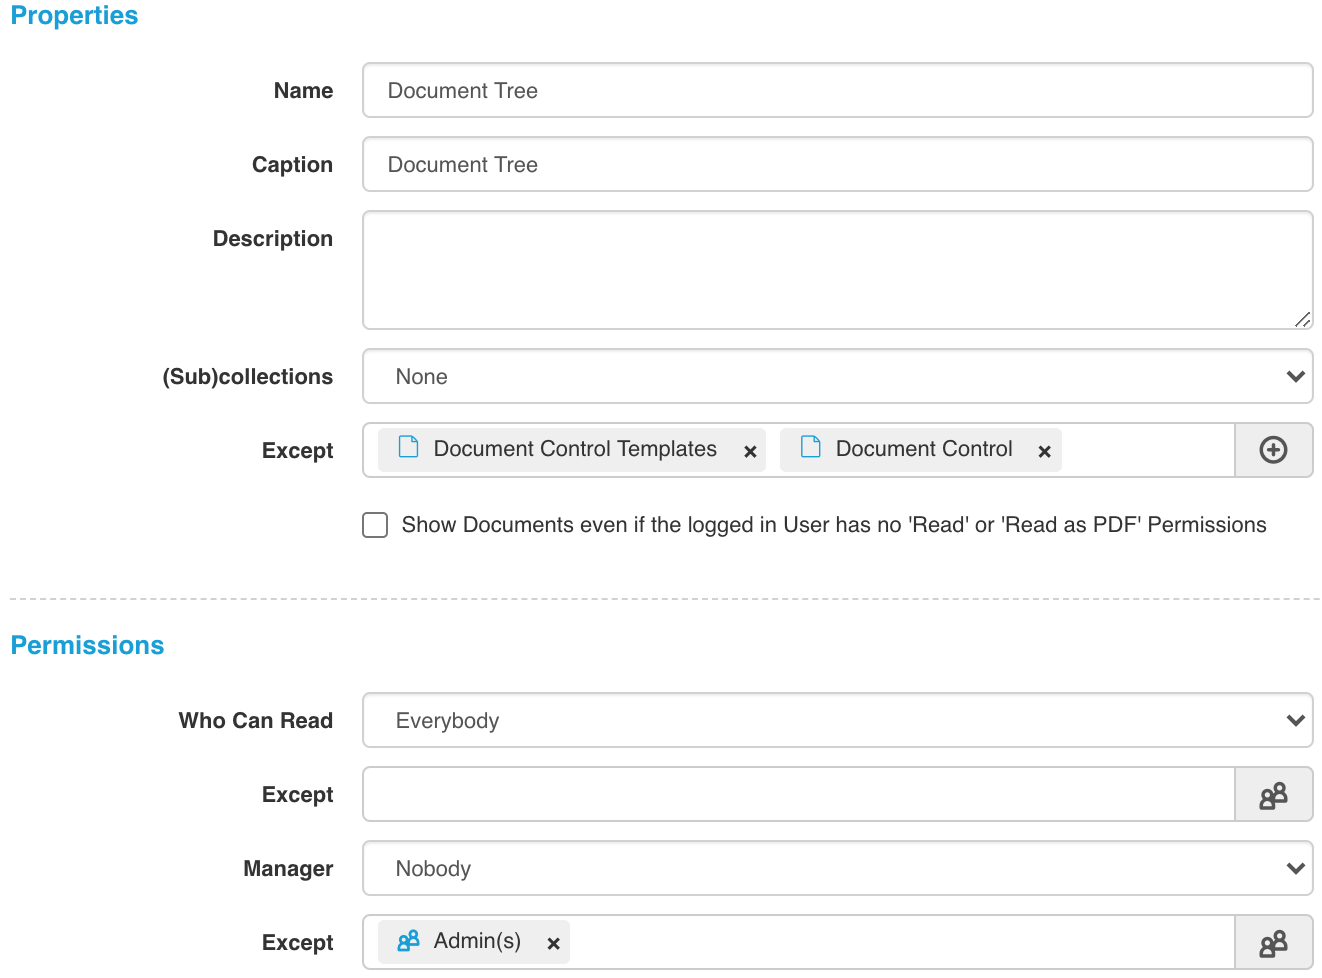
Decide whether you want to show the records to your users, even if they have no read or read PDF permissions. This means that they will see that there is a record in the system, but will not be able to consult the document and the collection form itself. If you disable this option, then the user will not see these records in the folder or list.
Choose upon the permissions, who can read/view this widget on the dashboard in the user interface? Who's the manager of this widget? Define the permissions and save your widget. The creation of folders and adding documents happens in the user interface. Before you continue to the user interface, please don't forget to place this widget on a dashboard of your choice.
Let's continue to the user interface;
The rootfolder of your document tree, will have the exact same name as the name that you chose for this widget. Click on the rootfolder and go change the properties by clicking on the cog wheel. The properties will allow you to change the name, and also to change the folder permissions on this level.
The folder permissions will show you who's the manager of this document tree (this is the same manager that you have chosen in the settings part of this widget), who can edit these folder properties and who can add subfolders to this root folder.
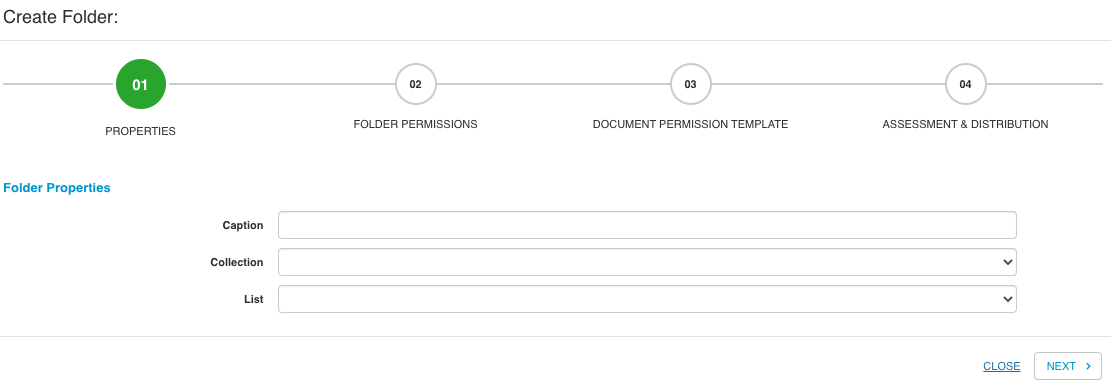
Next, if you have the right permissions, you can add new folders under this root. Click on the plus button to do so, BizzMine will guide you through a four step wizard to complete the creation of your folder.
Step 1: Properties
In the properties section of the folder creation, you'll have to give a name to your folder and you'll need to select a collection. This means that you'll create a folder wherein you can add documents that will make use of the form of that collection, and will go through the workflow of that collection. You can only select one collection per folder. When a collection has been selected, you'll be able to select a list view for your folder. For example; Where in a regualr list widget, you would set grouping on document type, you might want to skip that grouping now when working in folders, when your folder already indicates the document type. Hence, this information is unnecessary. If you made your choice here, please go on to the next step of your folder creation.
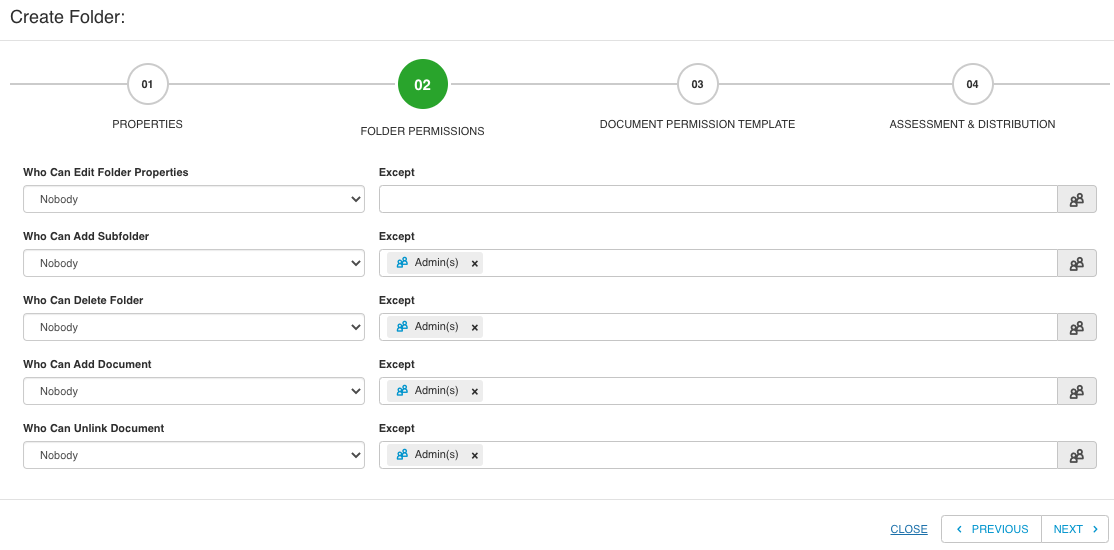
Step 2: Folder Permissions
Here you'll determine the permissions on the folder itself. So this is not related to the documents that are uploaded in this folder, but only to the folder. You'll decide who can edit these folder properties, who's allowed to add a subfolder, who can delete this folder, who'll be able to add new documents to this folder and finally who can unlink documents from this folder. So this means just removing them from the folder, but not deleting the document (so the document record stays in the collection). To delete the document itself would require other permissions. By default these permissions are set on "nobody except the person who is creating this folder right now".
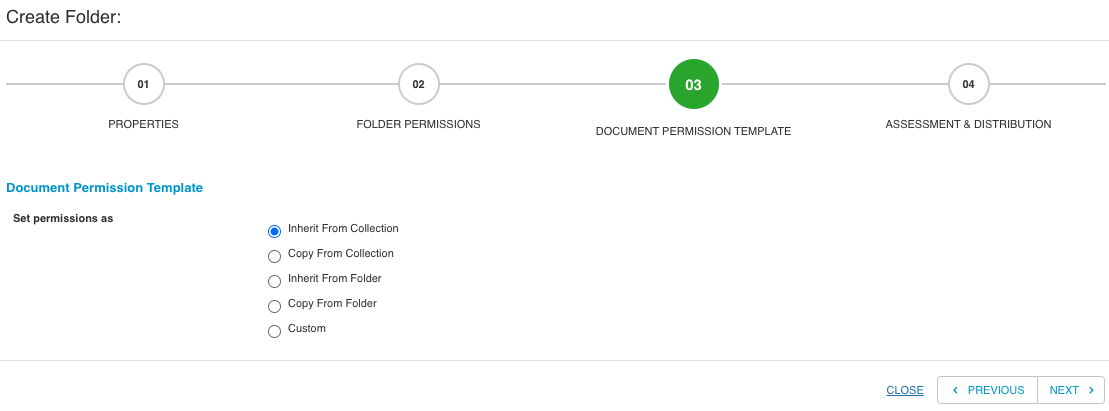
Step 3: Document Permission Template
Here we'll decide on the permissions that will be applied to the documents that are uploaded in this folder. Will they inherit the permissions from the collection? Will the permissions be copied from the collection (and thus editable on document level)? Instead of choosing for collection level, you can now create a folder template. You'll have the option to determine whether the documents then should inherit the permissions from that folder template, or whether they should copy the permissions from that folder template. If you select one of the folder options, you'll notice there's an extra part appearing, where you'll be able to set the template. If none of the previously mentioned options satisfy your needs, you can always choose for the "custom" setting. Where you'll -as you know- have to set the permission for each part yourself. Default settings when choosing custom are always "nobody, except the person that uploads the document".
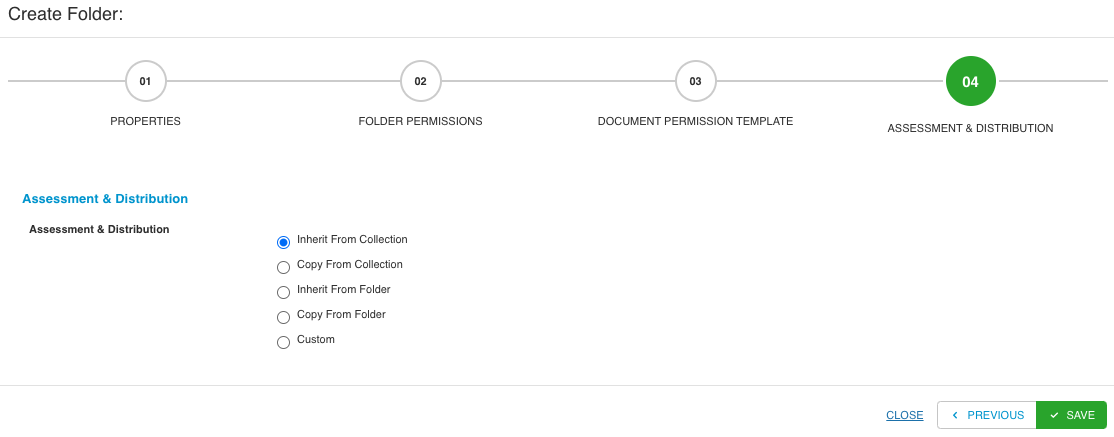
Step 4: Assessment & Distribution
Same as for the document permission template, you'll now have the option to set an assessment & distribution template. Remember that in document flows, we can have assessment steps and distribution steps. Therefor we will use display fields, to literally display the assessors and distribution list on the collection form. These display fields can be populated with the default values as you configured in your workflow if you chose for inherit from collection or copy from collection. Now, instead of using the same assessors and distribution list as determined on collection level, you can now create assessment & distribution templates per folder. You can decide per assessment or distribution step whether you want to choose a different default value. You'll also see that you can choose whether you want this for your create flow, or if this should be applied to your revision flows as well. Check the necessary checkboxes and create your templates.
Adding a document to a folder
There are 2 possibilities: adding documents that already exist or adding a new document. You do both with the plus at the top: Create new document or Link existing document. With Create new document you end up back in the form as we have seen in the beginning how to create a document. This way the document is immediately in the right collection and also in the right folder. Which actually makes it quite handy. Suppose the document already exists, but it is in the folder BizzMine Documentation and you want the document in Folder 1, then that is perfectly possible. Then you choose Link existing document. Or a document that is not yet present in any folder, but you find it in the list with All Documents: Link Existing document. Then here you have a list of all documents
No questions yet.